***ALERT***NEWS UPDATE***BREAKING STORY***ALERT***NEWS UPDATE***
Well, I was planning to keep this blog and all it's snazzy tips and tricks dedicated to Green-ish living, BUT I had a topic request! Yes, by golly folks, a real and genuine topic request based on a practice we've recently implemented in our family. So, here's the story --
Dem Bones:
Our family consists of myself, my husband, our three kids (ages almost-7, almost-6 and almost-5-months) and my mom.
As is often the case in families with young kids, communication is not always our strongest suit -- I mostly run amok with the kids, chauffeuring them around to school and their various activities/appointments, my husband works full-time and my mom is mostly-retired, but still works a couple of days each month, volunteers as a docent at our local natural history museum and periodically goes on luncheons with her friends.
The Goal:
Super Shiny New and Improved lines of communication!
Well, Bang Howdy... But HOW?!:
My husband is big into TED Talks, and had come across one about Agile Family Programming. The premise set forth in this Talk was opening and establishing paths to better communication through regular and frequent family meetings, where everyone is given a chance to talk and, more importantly, be heard.
We pull the family together one night each week, gathering around the dinner table to talk about the past week and the coming week. At each meeting, we follow the same basic outline and take a few moments to go over specific bullet points. I call them: "The Good", "The... Not-so-Good", "Goals" and "To-Do's".
The Break Down:
* The Good -- Each person thinks of one good thing from the past week.
* The Not-so-Good -- Now each person now thinks of one bad or "not-so-good" thing from the past week.
* Goals -- This is a personal goal. One thing each person would like to accomplish in the coming week.
* To-Do's -- This is a more general, household to-do item. Something that needs to get done around the house, but can be done by anyone.
That's Nice an' all, but Why's it sooo Important?:
I'm sure that there is always at least one person in every family who feels like their voice isn't being heard, their wants aren't being met and/or their needs are falling through the cracks. This gets everyone together in one place to hash things out and make sure we're all on the same page. Now, we don't get into anything major like personal grievances or grudges, but this is a great forum for everyone to let the others know how they're feeling, what they feel is important and what they want to see get done around the house.
I Got Hi-igh Hopes:
The dream here is that, by establishing this means of communication now, we will have continued and, dare I hope, better communication with the kids as they grow older. We're laying the foundation with goals like "I wanna have a playdate with (fill-the-blank)" that I'm hoping will build into a very sound house that can withstand the storms of the dreaded Tween and Teen years to come.
******WE NOW RETURN YOU TO YOUR REGULARLY SCHEDULED PROGRAMMING******
Saturday, August 31, 2013
TECHoupage
About a year-and-a-half ago I bought a hard case for my phone off of Amazon for $1.50 + shipping. Great deal, right?! This case was Super Cute (pink-and-black skulls & flowers in a matte finish), and has lasted through several drops, spills and high-speed skids across the floor. The case is none the worse for wear, but the same definitely can't be said for that cute little picture I liked so much. :-(
After a year of use and abuse, my cute little case has ended up looking beaten, battered and rather bedraggled:


 SO, like any good little Crafty Geekling out there, I decided to replace the picture on my case... Then decided that decoupage was for certain the best way to do it! Having never decoupaged anything before, I quickly set about half-assedly Googling the supplies and steps of said process. Feeling reasonably confident and ready to test my new mad skills, I gathered my supplies -- Fine-grit sand paper (150 grit, for anyone who cares), New and Improved Cute Pictures, glue and a glass bottle with a lid that seals tightly.


Now, for the fun part... Sanding down the case, to remove the uneven remaining paint. This took entirely too long for my liking, but was made more enjoyable by the watching of several episodes of Phinneas and Ferb with my kids. The end result was a nice, blank white case:


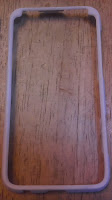 Ahhh.... A clean slate... After answering many questions from my kids as to why I wanted a white case when my old one had been so cute, I moved on.
I combined equal parts of glue and water in my bottle that seals tightly...

 The resulting concoction looked so milky white, my 5.5-year-old son asked if he could drink it. The obvious answer is: NO - DON'T DRINK THE GLUE-WATER!
Next I cut out the pictures,
 then laid them out on my case, adjusted them until I was happy, and took a picture of the case so I could remember how I had placed them:
 That done, I painted on a coat of the glue-water over both halves of my case, re-placed the pictures, then settled in for the exciting business of watching the glue dry... Which is just about as exciting as watching paint dry, but not quite on a level with watching grass grow.
Once the first coat dried, I brushed on another coat of the glue-water, which initially gave a satisfactorily glossy appearance to my case:

 I'm not quite done yet -- I do need to add more coats of the glue-water to better seal and protect the pictures, but this seemed like a good point in the project to share, since I'm not sure how many watching-glue-dry sessions I'll have to endure before I can really and truly call this project complete.
All in all, this has been a fun craft... But here's a few things I've learned:
- Watching glue dry ain't all it's cracked up to be! (Seriously, though, just make sure you have a safe, flat place for your project to dry and it can fend for itself).
- Craft stores do sell a Decoupage solution. I'm not sure how it compares to this fancy glue-water of mine. I was hoping for a glossy finish... Maybe the store-bought solution would have provided that.
- The pictures faded as the glue-water absorbed and dried -- I used my home ink jet printer and regular printer paper. I will try a different medium next time; perhaps magazine pics or pics done on a laser printer...
- This is super easy, but time-consuming!! You will definitely want to make sure your patience is among your craft supplies on this one (I was only able to do one glue coat in a day, to allow it to fully dry).
After a year of use and abuse, my cute little case has ended up looking beaten, battered and rather bedraggled:


Now, for the fun part... Sanding down the case, to remove the uneven remaining paint. This took entirely too long for my liking, but was made more enjoyable by the watching of several episodes of Phinneas and Ferb with my kids. The end result was a nice, blank white case:


I combined equal parts of glue and water in my bottle that seals tightly...

...and shook the heck out of it!

Next I cut out the pictures,


Once the first coat dried, I brushed on another coat of the glue-water, which initially gave a satisfactorily glossy appearance to my case:

Then had the audacity to dry with more of a matte appearance, leaving the finished product looking a little something like this:

All in all, this has been a fun craft... But here's a few things I've learned:
- Watching glue dry ain't all it's cracked up to be! (Seriously, though, just make sure you have a safe, flat place for your project to dry and it can fend for itself).
- Craft stores do sell a Decoupage solution. I'm not sure how it compares to this fancy glue-water of mine. I was hoping for a glossy finish... Maybe the store-bought solution would have provided that.
- The pictures faded as the glue-water absorbed and dried -- I used my home ink jet printer and regular printer paper. I will try a different medium next time; perhaps magazine pics or pics done on a laser printer...
- This is super easy, but time-consuming!! You will definitely want to make sure your patience is among your craft supplies on this one (I was only able to do one glue coat in a day, to allow it to fully dry).
Saturday, August 17, 2013
Oh Scrap!
I love to crochet and knit and, as a result, I have a lot of yarn scraps just loafin' about. Oh, you know their type - poor sad little ragamuffin balls of yarn, too small to do anything with by themselves but, gosh darn it, you just can't bring yourself to cast them out into the big cold world all on their lonesome... So, what do you do with them?!? Well, here are a few ideas to knock around your noodle the next time you find yourself with a few half-skeins left over.
 Take two sticks/popsicle sticks/straws and cross them in an "X", then begin wrapping yarn around them from the middle and work out to the ends. These can be made in any size, depending on how much scrap yarn you have, and are a very quick and easy project for kids.
 I've always made these by simply wrapping yarn around my fingers until I have a pretty good sized ball of yarn, then slide the ball off of my fingers, tie a string tightly around the middle of the ball and clip all of the loops until it is a big, fluffy ball. The best part is, you can make them in any color you happen to have lyin' around, or you can buy specific yarn to make themed fuzzies! Paper Turtle Blog has a great set of snow-themed fuzzies, and it literally just occurred to me that these could make fantabulous stunt doubles for Tribbles at a Star Trek themed party, if done in all browns/blacks/greys! Surprise, surprise... This is another quick kiddo boredom buster.
You're welcome.


1. "Gods-eyes" or "Evil Eyes":

2. "Warm Fuzzies":

You're welcome.
3. Friendship bracelets:
Braid them, knot them, just tie the stings around someone's wrist - Badabing! Insta-friendship bracelet! Especially good for - You got it - KIDS to make! (Are we sensing a theme here, yet?? Sorry, I have kids!)
4. Make something else!
Like I said, I tend to end up with a lot of scraps, so what better to do with them than to give them friends and make something big with the whole lot of 'em? What do I mean, hmm? Well, I decided to make each of my kids a blanket from all of my scrap yarns I had at the time of their 1st Birthdays.
Both blankets

Haley's blanket

Jamie's blanket
The best part is that, with the blankets being made entirely of scrap yarns, I can add to their length and width as much as I want to, so that the blankets can grow with the kids - ie. going from toddler-bed-sized to twin-bed-sized to bigger-if-wanted-sized.
Scrap on, my good fellows!
Thursday, August 1, 2013
Just Spoolin' Around...
**Spoiler Alert**
I'm just not that creative!
I'm going to start this post with the disclaimer that none of these ideas are original to me in any way, shape or form. Wherever possible, I will include links to the websites I got these fantabulous ideas from.
Have you ever wondered what to do with that cardboard spool that gets left behind like a forgotten toy when all of the toilet paper or paper towels are gone? I mean, it has a specific function, and it has done it's job well... What more does it want from life? Well, in our household, we give these little tubes new jobs to do. From entertaining the kids to warming the house, they have proved to be quite valuable little things.
Toys & Music Makers
You're probably wondering how a cardboard tube can entertain kids - and possibly wondering just how cheap a parent I am that I give my kids cardboard tubes as toys - but, really, you don't have to look any further than a child's imagination for your answer. This simple item can easily become a telescope or binoculars, a megaphone or a noise-maker (just add beans, paper & rubber bands!). Maybe its a messenger tube for carrying important documents across the kingdom, or a mysteriously encoded map that leads to hidden treasure. My kids always come up with something new to do with these spools... Maybe I should start keeping an Official List!
Crafts
There are far too many craft possibilities, so here's a link to the Google search for Cardboard Tube Crafts that I did while looking for new ideas. There are kids craft ideas galore, but also some pretty amazing ideas that would work as decor, even in a grown-ups-only home! One of my favorite ideas of all time is to cut eyes in a toilet paper spool, insert a glowstick and hide it in the bushes around an outdoor seating area so that spooky floating eyes are watching unsuspecting guests come nightfall. If you're having trouble imagining this on your own, here are a couple of pics I found over at The Purple Pumpkin Blog to help you out:

.JPG)
Have you ever wondered what to do with that cardboard spool that gets left behind like a forgotten toy when all of the toilet paper or paper towels are gone? I mean, it has a specific function, and it has done it's job well... What more does it want from life? Well, in our household, we give these little tubes new jobs to do. From entertaining the kids to warming the house, they have proved to be quite valuable little things.
Toys & Music Makers
You're probably wondering how a cardboard tube can entertain kids - and possibly wondering just how cheap a parent I am that I give my kids cardboard tubes as toys - but, really, you don't have to look any further than a child's imagination for your answer. This simple item can easily become a telescope or binoculars, a megaphone or a noise-maker (just add beans, paper & rubber bands!). Maybe its a messenger tube for carrying important documents across the kingdom, or a mysteriously encoded map that leads to hidden treasure. My kids always come up with something new to do with these spools... Maybe I should start keeping an Official List!
Crafts
There are far too many craft possibilities, so here's a link to the Google search for Cardboard Tube Crafts that I did while looking for new ideas. There are kids craft ideas galore, but also some pretty amazing ideas that would work as decor, even in a grown-ups-only home! One of my favorite ideas of all time is to cut eyes in a toilet paper spool, insert a glowstick and hide it in the bushes around an outdoor seating area so that spooky floating eyes are watching unsuspecting guests come nightfall. If you're having trouble imagining this on your own, here are a couple of pics I found over at The Purple Pumpkin Blog to help you out:
.JPG)
Around-the-House
I wish I knew where my mom found this great idea last Fall, but I found it again on The Green Wife - Using a cardboard spool and the lint from your dryer's trap, stuff the lint into the spool, et voila! Homemade fire-starter for your fireplace or wood burning stove. Not only does this re-use two items from your house, it also saves you a heck-of-a-lot of money during the Fall and Winter months!
This is just a few of the many ideas I've seen hither and yon, both on and off the intarwebs - mostly, they're the ones I've tried out myself, or plan to in the near future - but, by no means, is this the full extent of the fabulousness to which cardboard spools can be put. The next time you finish off a roll of TP or paper towels, don't just throw that little tube into your recycling bin! Take a good long look at it and dare to dream big on what something so simple can become in a second life!
Subscribe to:
Comments (Atom)